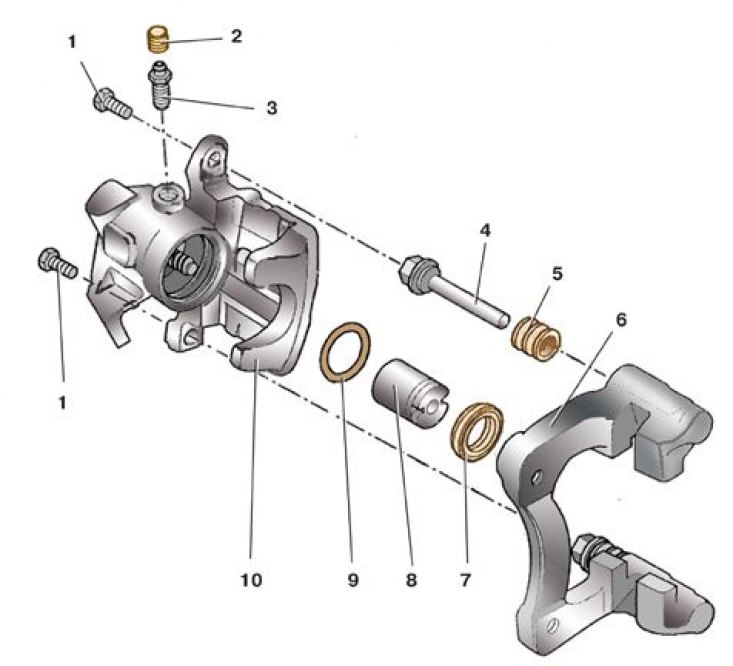
Rear wheel disc brake caliper parts

1 – a bolt of fastening of a support; 2 - protective cap; 3 - air release valve; 4 - guide pin; 5 - protective cover; 6 - guide pads; 7 - protective cap; 8 - piston; 9 - sealing ring; 10 - support
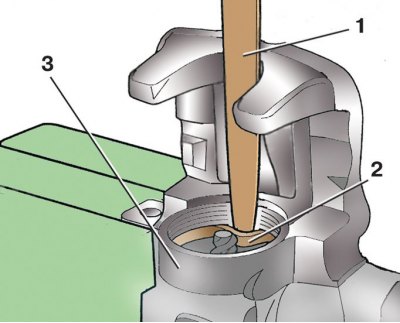
Removing the o-ring from the caliper cylinder

1 - scapula; 2 - sealing ring; 3 - caliper cylinder
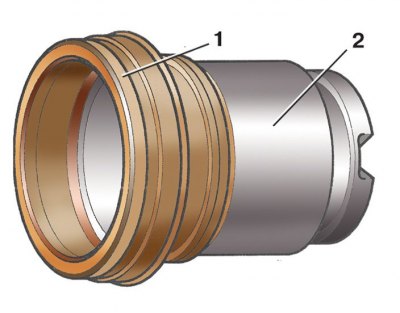
Installation of a protective cap on the piston

1 - protective cap; 2 - piston
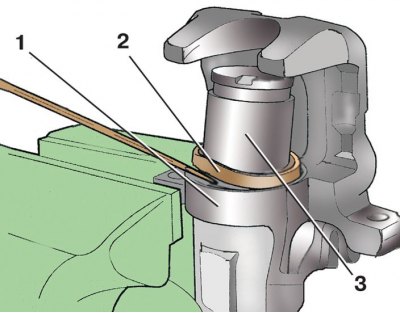
Installing the piston in the caliper cylinder

1 – caliper cylinder; 2 - protective cap; 3 - piston
Attention! When repairing a caliper, always use the repair kit completely.
1. Remove the wheel by first loosening the bolts of its fastening on the car standing on the ground.
2. Turn away a hollow bolt of fastening of a brake hose 15 (see fig. Rear wheel disc brake parts) to a support 17. Having disconnected a brake hose, muffle its opening.
3. Loosen two screws 2 (see fig. Disconnecting the parking brake cable) caliper fasteners, holding the second key guide pins 3 for the hexagons.
4. Remove caliper 17 (see fig. Rear wheel disc brake parts) with guide 21 pads.
5. Remove the brake pads 18 and 19 from the caliper 17. If the pads do not need to be replaced, mark them in order to install them in their original places. During operation, the pads wear in, so if you swap them, braking will be uneven.
6. Remove piston 8 from cylinder (see fig. Rear wheel disc brake caliper parts) using a special tool or in its absence, use, for example, pliers to remove the circlips. There are special grooves on the piston for this.
7. Remove the protective cap 7 from the cylinder. Replace a cap that is torn, cracked or has lost its elasticity.
8. Remove O-ring 2 (see fig. Removing the o-ring from the caliper cylinder) from the groove of the cylinder with a wooden or plastic spatula 1, so as not to damage the mirror of the cylinder 3.
9. Inspect the cylinder bore and piston. If there are deep scratches, scratches, roughness, etc. replace the caliper assembly.
10. Rinse thoroughly with alcohol and dry the piston and cylinder with compressed air.
11. Replace torn or loose protective covers 5 (see fig. Rear wheel disc brake caliper parts) guide fingers.
12. Lubricate piston 8 and new O-ring 9 with G 052 150 A2 grease or brake fluid. Replace the O-ring at every disassembly, regardless of its condition.
13. Install a new O-ring 9 into the cylinder groove. Replace the ring at every disassembly, regardless of its condition.
14. Put on protective cap 1 (see fig. Installation of a protective cap on the piston) on the back of the piston 2, turning its inner edge inside out.
15. Carefully insert the outer edge of the protective cap 2 (see fig. Installing the piston in the caliper cylinder) into the groove of cylinder 1.
16. Screw the piston into the cylinder using a special tool, and if it is not available, you can use, for example, tongs to remove the circlips. There are special grooves on the piston for this.
17. Remove dirt and old grease from guide pins 4 (see fig. Rear wheel disc brake caliper parts) and holes for them in the guide 6 pads. Check: the fingers should move freely, without jamming, in the holes of the guides.
18. Install protective covers 5 on the fingers, putting the edge of the cover on the shoulder of the finger. Lubricate the fingers under the covers with grease before installation (lubricant is included in the repair kit). Install the fingers in the holes of the shoe guide, putting the edges of the covers on the shoulders of the guide shoe.
19. Install the caliper in reverse order, placing the pads in it in accordance with the previously made markings. When connecting the brake hose 15 (see fig. Rear wheel disc brake parts) note - a metal gasket must be installed under the hose tip.
20. Bleed the brake system (see subsection 9.9.6) and adjust the parking brake (see subsection 9.9.2).
