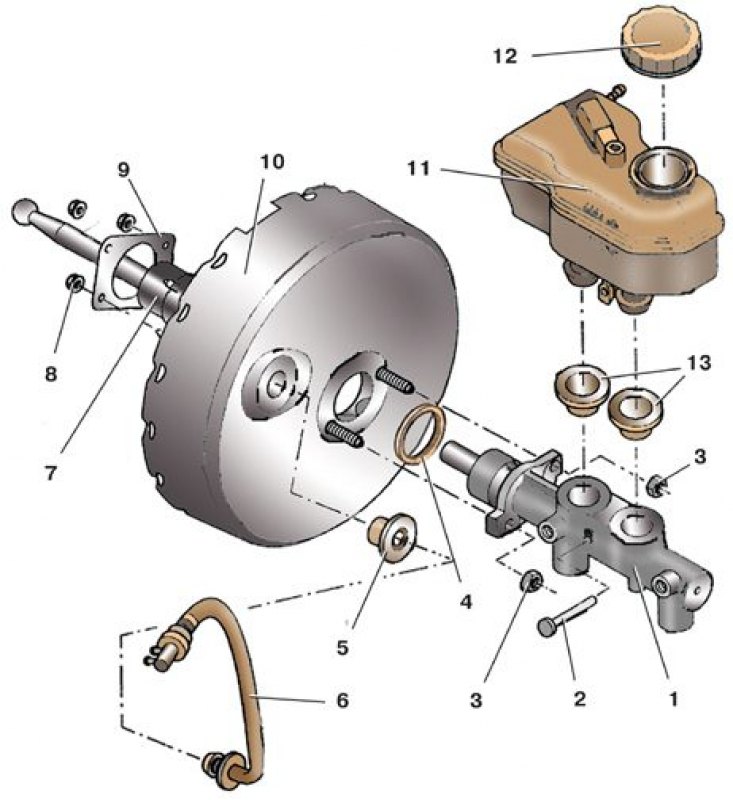
Vacuum booster with master cylinder

1 – main cylinder; 2 - pin; 3, 8 - nut; 4 - sealing ring; 5, 13 – sealing sleeve; 6 - vacuum hose with check valve; 7 - protective cap; 9 - gasket; 10 - vacuum amplifier; 11 - tank; 12 - tank cover
Attention! The vacuum booster cannot be repaired; in the event of a malfunction, it must be replaced as an assembly.
Attention! After removing the vacuum booster, the self-locking nuts of its fastening must be replaced with new ones.
Examination
1. With the engine off, press the brake pedal 5-6 times.
2. Keeping the brake pedal depressed, start the engine. The brake pedal should move forward.
3. If this does not happen, check the operation of the non-return valve and the tightness of the vacuum hose 6 (see fig. Vacuum booster with master cylinder). The check valve should only allow air to flow in one direction.
Removing
1. Remove the brake master cylinder (see subsection 9.3).
2. Disconnect the vacuum hose 6 (see fig. Vacuum booster with master cylinder) from the vacuum booster 10.
3. Unscrew the mounting bolt and remove the air duct for blowing the driver's legs (see subsection 11.6). On models equipped with «Comfort», remove the central control unit.
4. Remove the brake light switch (see subsection 9.10.7).
5. Disconnect the brake pedal from the pusher of the vacuum booster (see subsection 9.1).
6. Loosen four nuts 2 (see fig. Mounting the pedal assembly) fastening the vacuum booster from the inside of the passenger compartment.
7. Remove vacuum booster 10 (see fig. Vacuum booster with master cylinder) from the side of the engine compartment.
Installation
1. Install the vacuum booster in the reverse order, while replacing the self-locking nuts 2 (see fig. Mounting the pedal assembly) or 8 (see fig. Vacuum booster with master cylinder) its fasteners are new.
2. Also replace the damaged gasket 9 installed between the amplifier and the bulkhead.
3. After installation, add fluid to the reservoir and bleed the brake system (see subsection 9.9.6).
The tightening torque of the vacuum booster mounting nut is 20 Nm.
