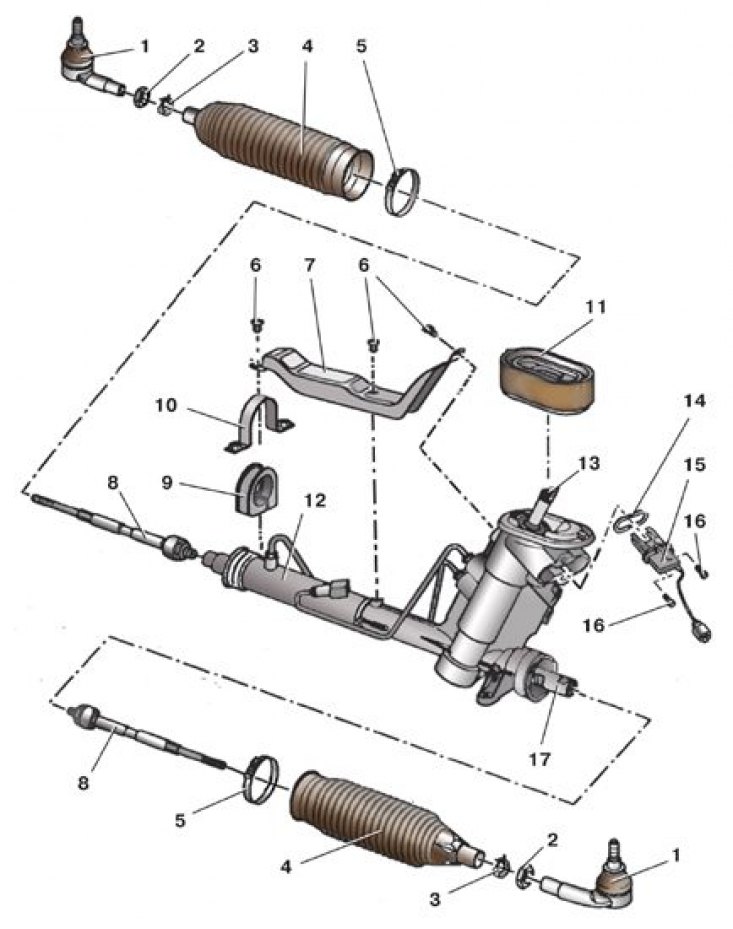
Steering gear parts (with amplifier)

1 - tip; 2 - locknut; 3 - outer clamp; 4 - protective cover; 5 - inner clamp; 6 - bolt; 7 - heat-insulating screen; 8 – steering draft; 9 - pillow; 10 - mounting bracket; 11 - sealant; 12 - steering gear housing; 13 - the shaft of the drive gear of the steering mechanism; 14 - gasket; 15 – the gauge of the amplifier of a steering; 16 – a bolt of fastening of the gauge of the amplifier of a steering; 17 - steering rack
1. Check and, if necessary, adjust the position of the steering rack (see subsection 8.4.4).
2. Soap pillow 9 (see fig. Steering gear parts (with amplifier)) steering mechanism support to facilitate installation of the mounting bracket 10 on it.
3. Install steering gear 22 (see fig. Mounting the steering mechanism on the car (with amplifier)) on the beam 21 of the front suspension and screw in new bolts 18 of its fastening, without finally tightening them.
4. Check the correct installation of the seal 11 (see fig. Steering gear parts (with amplifier)) on the steering box.
5. Carefully raise the beam so that you can connect the lines and the sensor to the steering gear, while inserting the steering gear shaft into the hole in the bulkhead.
6. Connect sensor 6 (see fig. Mounting the steering mechanism on the car (with amplifier)) amplifier to the steering mechanism, installing a new gasket 5, and secure with two bolts 7 with internal hexagons.
7. Connect pressure line 16 and return line 12 to the crankcase of the steering mechanism, using new sealing rings 13 and 15. Please note that the return line has an O-ring.
8. Attach the front suspension beam.
9. Tighten the new bolts 18 securing the steering gear to the front suspension beam to the appropriate torque.
10. Connect the tie rods to the swing arms.
11. Attach the struts to the stabilizer bar and tighten the fastening nuts.
12. Attach the rear support 20 to the gearbox with two new bolts 19.
13. On models with a downpipe that runs under the front suspension beam, install the downpipe with a converter.
14. Install the mudguard and front wheels.
15. Lower the car onto its wheels.
16. Fix the power steering sensor wire in the three holders 4 (see fig. Elements of the hydraulic power steering).
17. Put on the shaft of the drive gear of the steering mechanism fork 3 (see fig. Mounting the steering mechanism on the car (with amplifier)) cardan joint and fix the yoke with a new pinch bolt 4.
18. Insert sealant 11 into the opening of the front end shield (see fig. Steering gear parts (with amplifier)). Make sure it is even and tight.
19. Install shroud 2 (see fig. Fastening of a casing of a cardan shaft of a steering column) steering column cardan shaft and secure it with two plastic nuts 1.
20. Fill the power steering hydraulic system with hydraulic fluid (see subsection 8.5.10).
21. Reinstall the battery.
22. Install the air filter if removed.
23, Check and, if necessary, adjust the wheel alignment.
24. It is recommended that a service station check the operation of the electrical part of the power steering system using a special electronic device.
Tightening torques, Nm
| Bolts of fastening of the steering mechanism to a beam of a forward suspension bracket | 50, then tighten by 90° |
| Bolts of fastening of a back support to a transmission | 30, then turn 90° |
| Nuts of fastening of a bar of the stabilizer of cross-section stability to racks | 40 |
| Bolts of fastening of the gauge of the amplifier of a steering | 6 |
| Hollow bolt for fastening the pressure line to the steering gear housing | 35 |
| Nut of fastening of a returnable highway to a case of the steering mechanism | 30 |
| Coupling bolt for cardan joint | 20, then turn 90° |
| Bolts of fastening of a heat-insulating screen | 10 |
| Wheel bolts | 120 |
