
High and low beam lamps
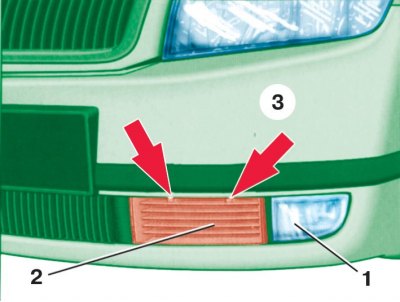
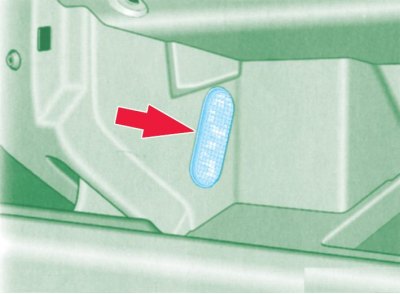
Removing the headlight cover
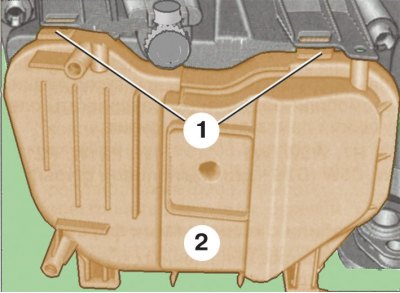
1 - retainer; 2 - cover
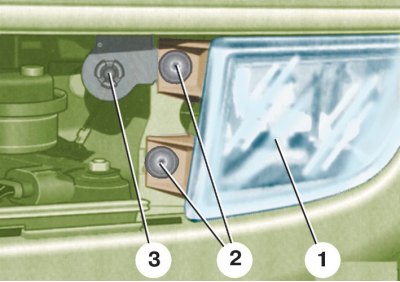
High Beam Bulb Replacement
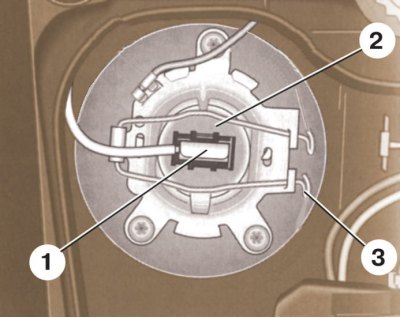
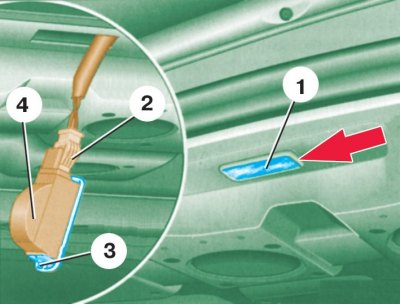
1 - connecting block; 2 - lamp; 3 - spring retainer
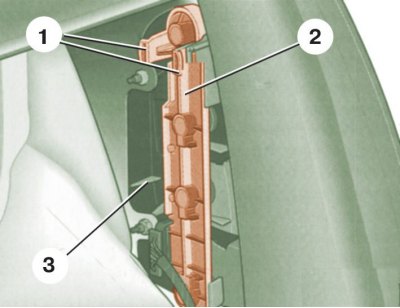
The location of the lamps in the headlight
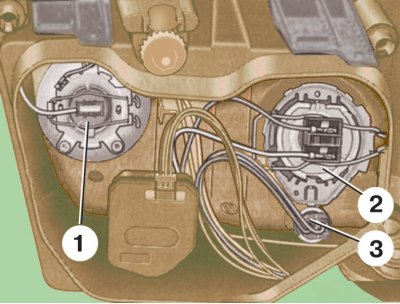
1 - high beam lamp; 2 - low beam lamp; 3 - side light lamp
Attention! Halogen lamps heat up to a high temperature during operation. Do not touch the lamp bulb with your hands: it will leave fatty traces, due to which the lamp will quickly burn out. If you accidentally touch the bulb, wipe it with a clean cloth dampened with alcohol.
1. For convenience of work with the left headlight remove a lateral cover of the rechargeable battery.
2. Disconnect the wire from the terminal «-» battery.
3. By pressing the two spring clips 1 (see fig. Removing the headlight cover), remove headlight cover 2.
4. Disconnect block 1 (see fig. High Beam Bulb Replacement) with wires from the high beam lamp socket.
5. Remove the ends of the spring clip 3 from the hooks on the headlight housing and turn the clip to the side.
6. Remove bulb 2 for high beam.
7. Insert a new lamp without touching the glass bulb with your fingers. In this case, the protrusions on the headlight housing must fit into the holes on the lamp base.
8. Rotate the spring clip into place and hook the ends into the hooks on the headlight housing. Then connect the block with wires to the lamp socket.
9. Install and secure the headlight cover.
10. lamp 2 (see fig. The location of the lamps in the headlight) low beam is replaced in the same way as the high beam lamp.
Side light lamp
1. Disconnect the wire from the terminal «-» battery.
2. By pressing the two spring clips 1 (see fig. Removing the headlight cover), remove headlight cover 2.
3. By pulling towards you, remove the socket with the lamp 3 (see fig. The location of the lamps in the headlight) side light from the headlight housing.
4. Remove the side light bulb from the socket, insert a new bulb and reinstall the socket.
5. Install and secure the headlight cover.
Front turn signal lamp
Replacing the front turn signal bulb
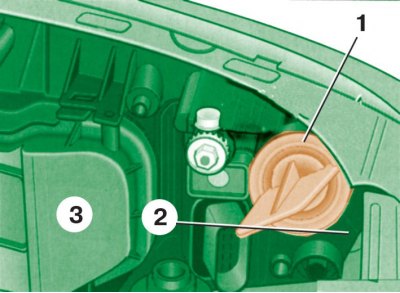
1 - cartridge; 2 – the case of the index of turn; 3 - headlight
1. Disconnect the wire from the terminal «-» battery.
2. Remove chuck 1 (see fig. Replacing the front turn signal bulb) with the bulb from the turn signal housing 2 by turning it counterclockwise.
3. Press on the bulb, turn it counterclockwise and remove it from the socket.
4. Insert the new bulb into the socket and lock it by turning it clockwise until it stops.
Fog lamp
Removing the ventilation grill
1 - fog lamp; 2 - ventilation grille; 3 - front buffer
Removing the fog lamp
1 - fog lamp; 2 - screws; 3 - ambient air temperature sensor
Fog Light Bulb Replacement

1 - fog lamp; 2 – ambient air temperature sensor; 3 - spring retainer; 4 - wire tip; 5 - lamp
1. Disconnect the wire from the terminal «-» battery.
2. Using a screwdriver, press out the two latches in the places indicated by the arrows in fig. Removing the ventilation grille, ventilation grille 2 (starting with the fixator nearest to the center) and remove grille 2 from the front buffer.
3. Remove screws 2 (see fig. Removing the fog lamp) headlight mounts. Please note that the upper screw of the left headlight also secures the ambient air temperature sensor 3.
4. Take out headlight 1 (see fig. Fog Light Bulb Replacement) from the buffer and remove the plug.
5. Disconnect tip 4 wires.
6. Remove the ends of the spring clip 3 from the hooks on the headlight housing and turn the clip to the side.
7. Remove bulb 5 with wire.
8. Insert a new lamp without touching the glass bulb with your fingers. In this case, the protrusions on the headlight housing must fit into the holes on the lamp socket.
9. Turn the spring clip into place, hook its ends into the hooks on the headlight housing and connect it to the wire block. Install the plug.
10. Reinstall the fog lamp and ventilation grille.
Tail lamps (hatchback body)
Removing the rear lamp holder
1 - latches; 2 - lamp holder; 3 - lantern
Holder with rear lamps
1 – a lamp of a signal of braking; 2 – a lamp of the index of turn; 3 – a lamp of light of a backing; 4 - side light lamp (in the left lamp it is also a fog lamp); 5 - lamp holder
1. Disconnect the wire from the terminal «-» battery.
2. Open the tailgate and fold down the edge of the upholstery to access the light 3 (see fig. Removing the rear lamp holder).
3. Squeeze the two plastic tabs 1 on the top of the lamp holder 2 to disengage them from the lamp body.
4. Remove the 2 bulb holder from the lamp housing.
5. Press the burnt out bulb, turn it counterclockwise and remove it from the holder 5 (see fig. Holder with rear lamps).
6. Insert the new bulb into the holder and lock it by turning it clockwise until it stops.
7. Insert the lower part of the holder into the flashlight body first, then the upper one, fixing the holder in the body. In this case, clicks should be heard.
8. Put the upholstery in place.
Tail lamps (sedan and station wagon)
View from the trunk to the taillight of the sedan and station wagon
1 - rear light; 2 - lamp holder
1. Disconnect the wire from the terminal «-» battery.
2. Open the trunk lid.
3. Carefully remove the cover from the trunk upholstery, blocking access to the lamp 1 (see fig. View from the trunk to the taillight of the sedan and station wagon).
4. Loosen the mounting screws and remove the 2 lamp holder from the lamp housing.
5. Press on the burnt out bulb, turn it counterclockwise and remove it from the holder.
6. Insert the new bulb into the holder and lock it by turning it clockwise until it stops.
7. Install the holder in the headlight housing and fix it with screws.
8. Reinstall upholstery cover.
License plate lamp
Mounting of the license plate light
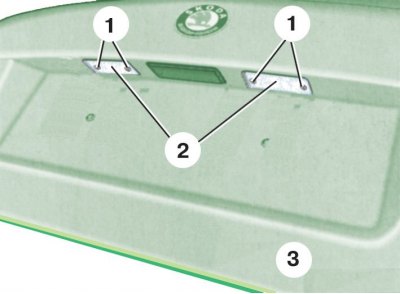
1 - screws; 2 - lantern; 3 - trunk lid
1. Disconnect the wire from the terminal «-» battery.
2. Open the trunk lid.
3. Remove two screws 1 (see fig. Mounting of the license plate light) license plate light fixtures.
4. Take out a lantern 2 from a cover of a luggage carrier.
5. Remove the lamp and insert a new one.
6. Install the lantern in place so that the rubber seal fits evenly, without wrinkles. Fix the lamp with screws.
Lamps of a plafond of lighting of salon and directional light
Interior lighting dome
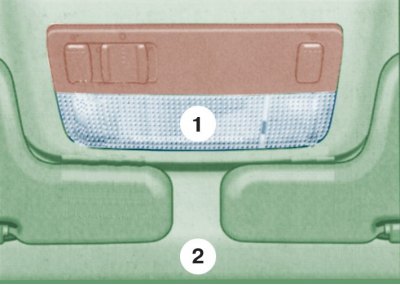
1 - diffuser; 2 - upholstery of the ceiling
1. Disconnect the wire from the terminal «-» battery.
2. Gently pry with a screwdriver at the front (indicated by an arrow), remove diffuser 1 (see fig. Interior lighting dome).
3. Remove the interior light bulb and insert a new one.
4. To replace a spotlight bulb, remove it from the socket and install a new one.
5. Install the diffuser in reverse order and fix it in the headlining.
Trunk lamp (hatchback and station wagon)
Removing the trunk light (hatchback and station wagon)
1. Disconnect the wire from the terminal «-» battery.
2. Open the tailgate and remove the rear shelf.
3. Gently prying with a screwdriver in the place indicated by the arrow in see fig. Removing the trunk light (hatchback and station wagon), remove the cover from the luggage compartment upholstery.
4. Disconnect the wires from the lampshade.
5. Remove the lamp and insert a new one.
6. Connect the wires to the lampshade.
7. First install the front part of the ceiling into the upholstery, and then, pressing the back part, fix it.
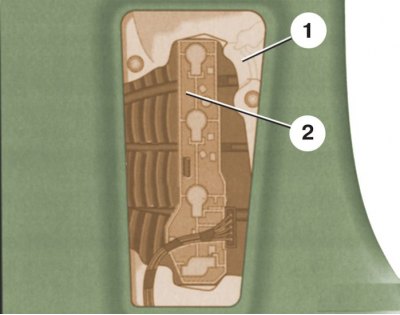
Trunk lamp (body sedan)
Removing the trunk light (body sedan)
1 - ceiling; 2 - connecting block; 3 - fixture of the ceiling lamp housing; 4 - body of the ceiling
1. Disconnect the wire from the terminal «-» battery.
2. Open the tailgate.
3. Gently prying with a screwdriver in the place indicated by the arrow in Fig. Removing the trunk light cover (body sedan), remove the cover 1.
4. Disconnect from a plafond 1 block 2 with wires.
5. Wring out a clamp 3 and remove the case 4 of a plafond.
6. Remove the lamp and insert a new one.
7. Establish the case and connect to a plafond a block with wires.
8. First install the rear part of the ceiling into the upholstery, and then, pressing the front part, fix it.
Glove box lamp
Removal of a plafond of illumination of a ware box
1. Disconnect the wire from the terminal «-» battery.
2. Open the glove box lid.
3. Gently prying with a screwdriver in the place indicated by the arrow in fig. Removing the glove box light, remove the light.
4. By pressing the latches, disconnect the block with wires from the lampshade.
5. Remove the lamp and insert a new one.
6. Connect the block with wires to the lampshade.
7. Gently press the cover into the side wall of the glove box, starting from the bottom.
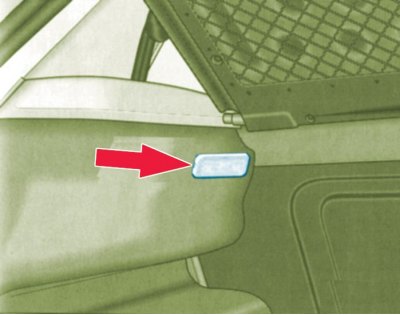
Signal lamp in the door
Replacing the signal light bulb in the door
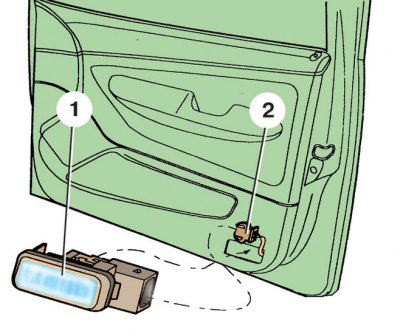
1 - lantern; 2 - block
1. Disconnect the wire from the terminal «-» battery.
2. Gently prying with a screwdriver, remove the lamp 1 (see fig. Replacing the signal light bulb in the door) from the door.
3. Disconnect from a lantern a block 2 with wires.
4. Remove the lamp and insert a new one.
5. Connect the wiring harness to the lamp.
6. Gently push the lantern into the door.
Side repeater lamp
Details of the side turn signal repeater
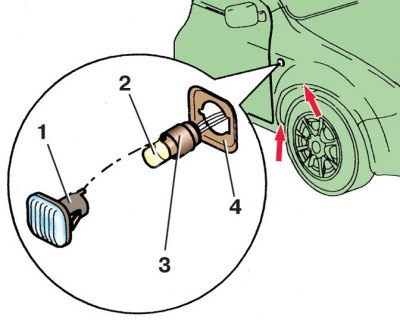
1 – repeater case; 2 - lamp; 3 - protective cover; 4 - gasket
1. Disconnect the wire from the terminal «-» battery.
2. Turn away two screws of fastening of a lokar in a wheel niche shown by arrows in fig. Details of the side turn signal repeater.
3. On the inside of the wing, squeeze the plastic tabs and push the repeater out.
4. Remove body 1 from protective cover 3.
5. Replace lamp 2 and install housing 1 on cover 3.
6. Install the repeater in the wing opening and press it against the wing until it locks into place. When doing this, note that the wider latch of the housing 1 must be directed towards the front of the vehicle.