Diesel engine
1.9L 74KW Diesel Engine Head
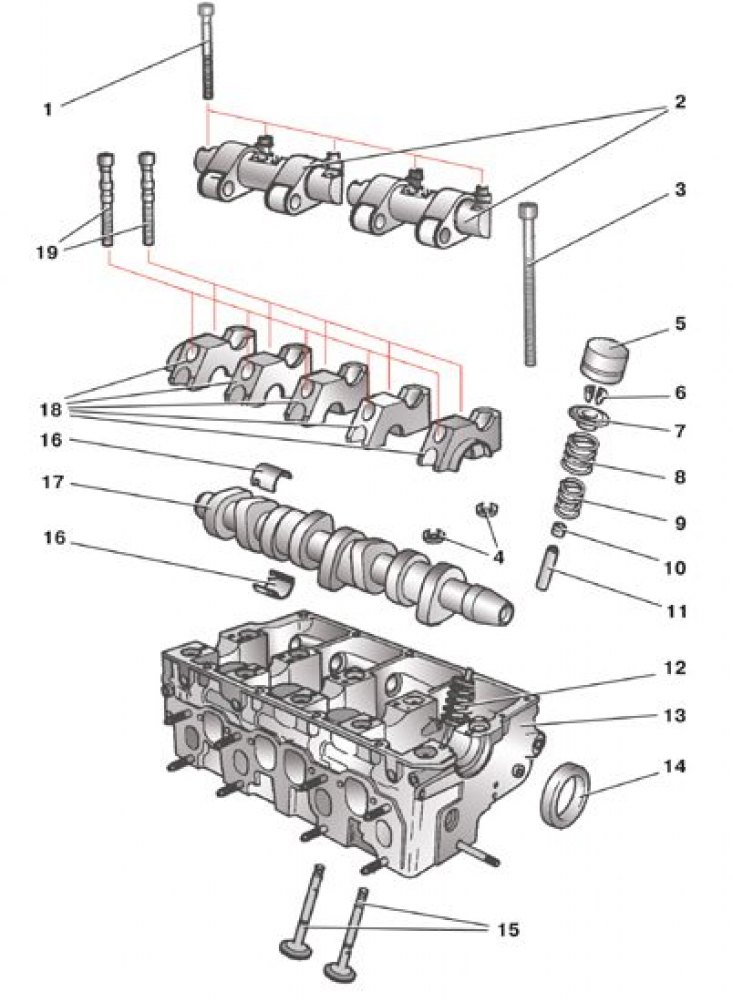
1 – a bolt of fastening of an axis of yokes of valves; 2 – axes of yokes with yokes assembled; 3 – a bolt of fastening of a head of the block; 4 - washer; 5 - hydraulic valve pusher; 6 - cracker; 7 - a plate of springs; 8 - outer spring of the valve; 9 – an internal spring of the valve; 10 - oil scraper cap; 11 - valve guide sleeve; 12 - pump-injector; 13 – a head of the block of cylinders; 14 – an epiploon of a camshaft; 15 - valves; 16 - camshaft bearing shell; 17 - camshaft; 18 - camshaft bearing caps; 19 – bolts of fastening of covers of bearings
Sealing locations on the first and fifth camshaft bearing caps
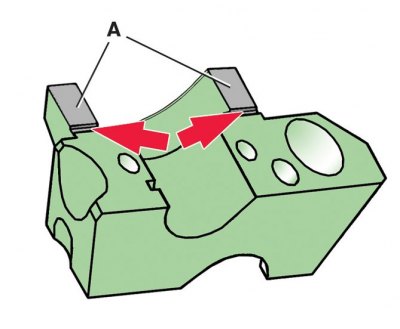
A - places for applying sealant
1. Remove the camshaft drive belt (see subsection 2.4.1).
2. Remove the camshaft pulley and hub (see subsection 2.8).
3. Remove the axles with rocker arms, having previously marked them so as not to be confused during installation (see subsection 4.14.4).
4. Remove the vacuum pump (see subsection 4.11).
5. Remove bolts 19 (see fig. 1.9L 74KW Diesel Engine Head) fastening covers 18 of the fifth, first and third bearings and remove the covers. Label the caps to avoid confusion during installation. If the inserts 16 are suitable for further use, do not remove them from the caps.
6. Loosen the bolts securing the second and fourth bearing caps evenly crosswise and remove the caps.
7. Remove the camshaft 17 from the head and remove the oil seal 14 from it. Remove the liners 16 from the head and mark on the non-working side so as not to confuse during installation.
8. Take out hydropushers of 5 valves. Label them or arrange them so that they are not confused during installation. Keep the hydraulic pushers in the same position as they were on the engine, otherwise oil will leak out of them.
9. Set the piston of the corresponding cylinder to TDC, then when the springs are compressed, the valves will rest against the piston.
10. Install a device for compressing valve springs on the head and, having compressed the valve springs, remove crackers 6.
11. Remove plate 7 and springs 8 and 9.
12. Using a puller, remove the oil seal.
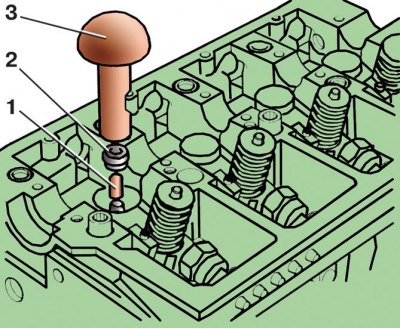
13. Lubricate the new cap with engine oil and insert it into the mandrel 3 (1 - bushing; 2 - oil scraper cap).
14. Put a plastic sleeve 1 on the valve stem so as not to damage the working edge of the cap.
15. Using a mandrel, carefully press the cap until it stops.
16. Reinstall the valve springs and spring plate.
17. After compressing the springs with a tool, install the valve cotters. After that, hit with a hammer through the metal rod on the end of the valve so that the crackers sit in place.
18. Replace other caps in the same way.
19. Install inserts 16 (see fig. 1.9L 74KW Diesel Engine Head) in accordance with the previously made marking and lubricate them with engine oil.
20. Install the camshaft in the head so that the cams of the first cylinder are directed upwards.
21. Install washers 4.
22. Install the second and fourth bearing caps and tighten the new bearing bolts evenly in a criss-cross pattern. Tighten the bolts to 8 Nm and tighten by another 90°.
Attention! Each time the camshaft bearing caps are removed, the bolts securing them must be replaced with new ones.
23. Apply sealant to surface A of the first and fifth bearing caps, making sure that the sealant does not get into the grooves indicated by the arrows in fig. Sealant application locations on the first and fifth camshaft bearing caps. Then install the first, fifth and third bearing caps.
24. Install all removed parts in reverse order. After installing the valve lifters, the engine can only be started after 30 minutes.
Petrol engines 1.4 l, 55 and 74 kW
Cylinder head for 1.4 l, 55 and 74 kW engines
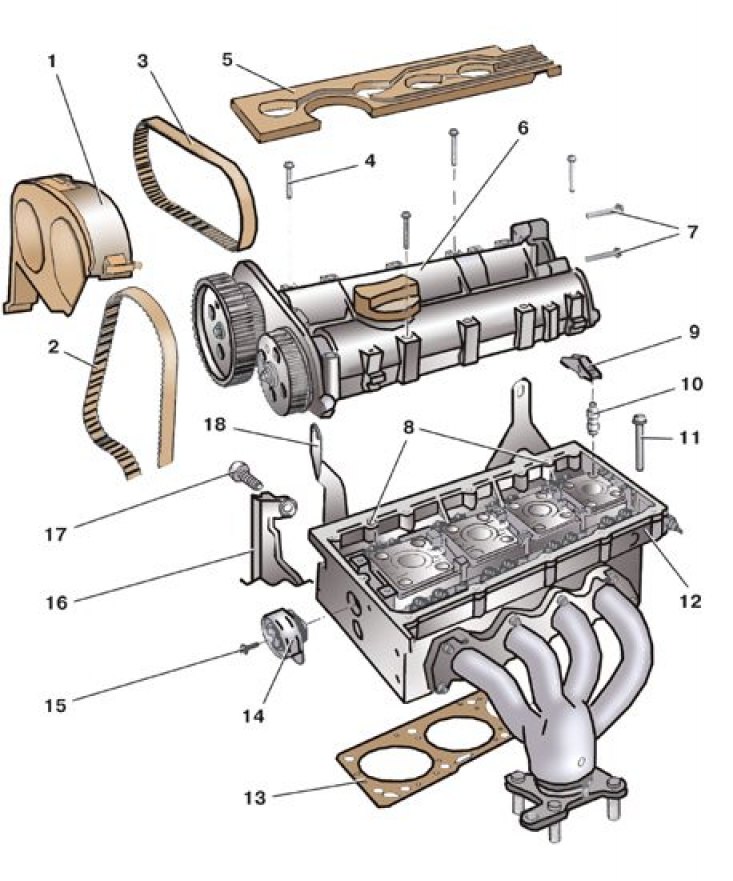
1 – the top cover of a belt of a drive of a camshaft; 2 – a belt of a drive of camshafts; 3 – a belt of a drive of a final camshaft; 4 – a bolt of fastening of the case of bearings; 5 - holder of high voltage wires; 6 – the case of bearings of camshafts; 7 – bolts of fastening of a back support of a camshaft; 8 - locating pins; 9 - valve rocker; 10 - hydraulic valve pusher; 11 – a bolt of fastening of a head; 12 – a head of the block of cylinders; 13 - head gasket; 14 - belt tension roller; 15 – a bolt of fastening of a tension roller; 16 – a back cover of a belt of a drive of camshafts; 17 – a bolt of fastening of a back cover; 18 - eye
The general procedure for replacing valve stem seals is the same as for a diesel engine. Taking into account the characteristics of the engines, the following should be done:
1. Remove the camshaft drive belt (see subsection 2.4.2).
2. Remove the ignition coil.
3. Remove spark plugs.
4. Turn away bolts 4 fastenings and remove the case 6 with camshafts in gathering.
5. Mark so as not to confuse during installation, and remove the rocker arms 9 and hydraulic pushers 10 valves. It is necessary to store hydraulic pushers in the same position in which they are on the engine, otherwise oil will flow out of them. Then dry the valves and remove the caps.
Petrol engines 1.0 l, 37 kW and 1.4 l 50 kW
Cylinder head for 1.0L 37kW and 1.4L 50kW engines
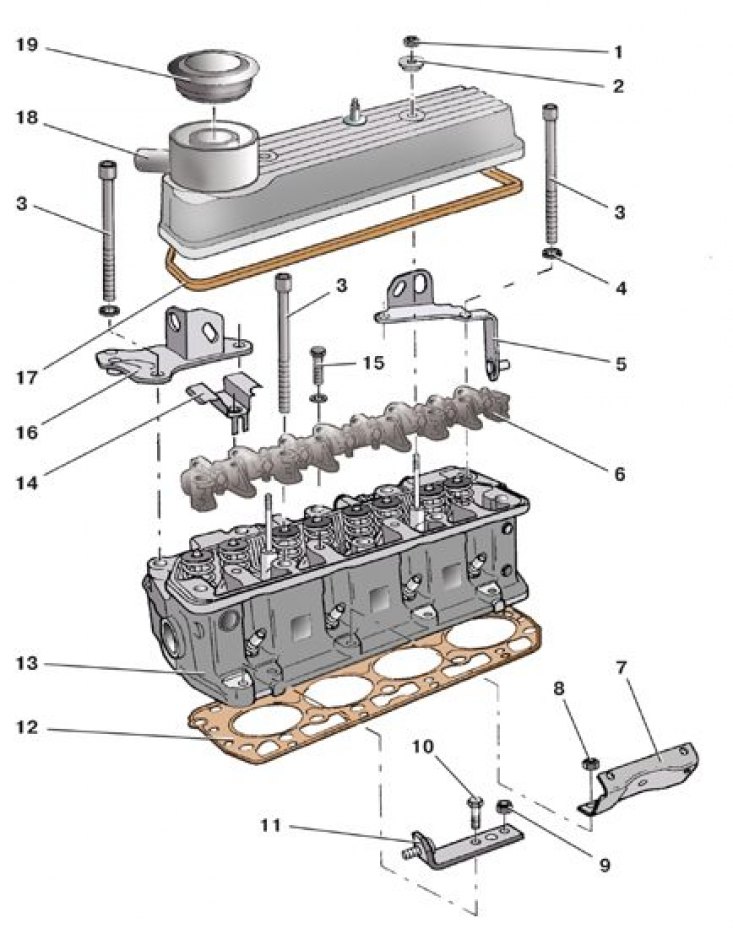
1 – cover fastening nut; 2 - sealing sleeve; 3 – a bolt of fastening of a head; 4 - washer; 5 - left eye; 6 - axis of the rocker arms in the collection; 7 - bracket; 8 - nut; 9 - self-locking nut; 10 - bolt; 11 - generator bracket; 12 - head gasket; 13 – a head of the block of cylinders; 14 - oil deflector; 15 – a bolt of fastening of an axis of yokes; 16 - right eye; 17 – block head cover gasket; 18 - block head cover; 19 - oil filler cap
The general replacement procedure is the same as for a diesel engine. Taking into account the characteristics of the engines, the following should be done:
1. Unscrew nuts 1 and remove rubber bushings 2.
2. Remove head cover 18 and gasket 17.
3. Turn away bolts 3 and 15 fastenings of an axis of yokes and remove an axis 6 yokes in gathering. Then dry the valves and remove the caps.
Tightening torques, Nm
| Petrol engines 1.4 l, 55 and 74 kW | |
| Bolt of fastening of a pulley of a camshaft | 20, then turn 90°further |
| Bolt of fastening of the case of bearings | 10, then turn 90°further |
| Bolt of fastening of a back cover of a camshaft | 10 |
| Eye bolt | 20 |
| Check valve of the lubrication system | 6 |
| Check valve screw plug | 45 |
| Diesel engine 1.9 l, 74 kW | |
| Bolt of fastening of an axis of yokes of valves | 20, then turn 90°further |
| Bolt of fastening of a cover of the bearing of a camshaft | 8, then turn 90° |
| Petrol engines 1.0 l, 37 kW and 1.4 l, 50 kW | |
| Nut of fastening of a cover of a head of the block | 3 |
| Bolt of fastening of an axis of yokes of valves | 25 |
