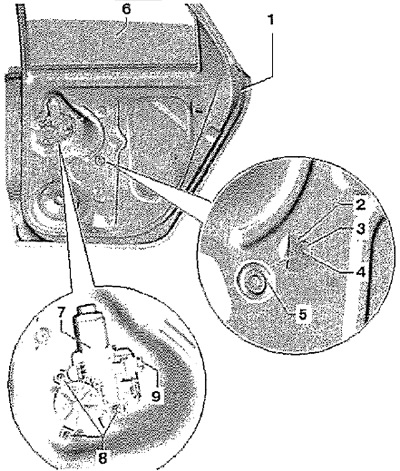
Remove rear door trim. Remove the inner door seal. Pry off and remove plug -5-. Lower door window -6- until expansion pin -4- and spacer insert -3- can be accessed through cut-out for power window regulator -2-.
Note: If this operation is not possible due to a defective electric window lifter, the electric motor -7- must be removed. Then the door glass can be moved to the desired height.
Screw in a 5 mm screw (length approx. 70 mm) into the grooved pin -4- and pull it out of the dowel -3-. Screw in the screw 8 mm (length approx. 80 mm) into the expansion plug -3- and pull it out of the glass.
Note: When screwing the screw into the expansion dowel, do not apply too much force, as otherwise, it may fall into the door.
Pull expansion plug -3- out of power window guide -1-. At the same time, he also comes out of the glass of the door.
Note: When removing the expansion bolt, hold the door glass with your hand so that it does not fall through the door and be damaged.

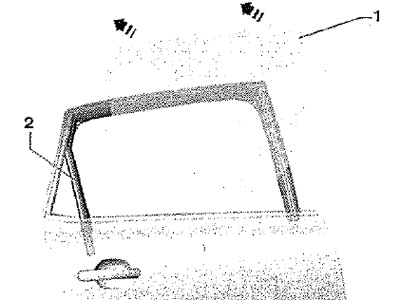
Remove the rear part of the glass guide -2- from the mountings. Pull glass -1- out of door cavity at an angle upwards -arrows- and outwards.
Installation
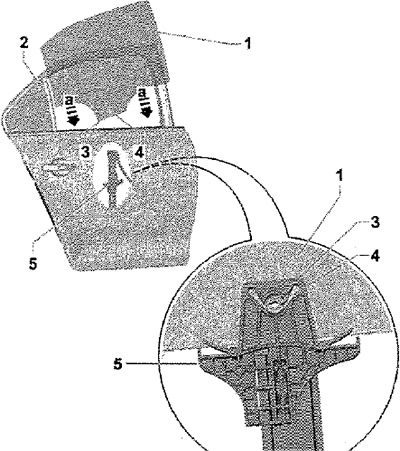
Note: Before installing expansion plug -3- and bee pin -4-, check door glass -1- for damage.

Center expansion plug -3- and insert with door glass -1- removed. Press grooved pin -4- into expansion dowel -3-. Insert window -1- into door -2- -arrows a- and insert into window guide -5-. Fix glass -1- in window lifter -5- with light pressure from above. Press until a click is clearly audible. The subsequent order of work is carried out in the reverse order of removal. Before installing the door trim, check the function.
