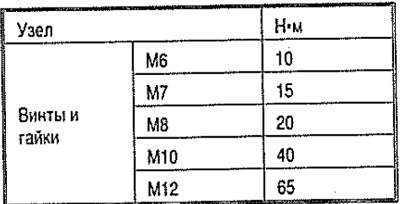
Tightening torques
Note: The tightening torques apply to lightly greased or oiled, phosphated or oxidized bolts and nuts. Additional lubricants allowed (e.g. motor or gear oils), except graphite-containing or MoS2. Do not use degreased parts.

Note: Replace screws that are tightened to the specified angle. Replace self-locking nuts as well as lip seals, O-rings and gaskets. Hose fittings and piping and charge air hoses must be free of oil and grease before installation. Secure all hose connections with appropriate standard clamps. All cable ties must be installed in their original positions during installation.
Install intermediate plate.
Note: Vehicle with DSG gearbox is shown as an example.
Insert centering sleeves -A- to center the gearbox when it is installed on the engine, if they are not in the cylinder block.

Vehicles with manual gearbox
If a needle bearing is installed in the crankshaft, then it must be removed. If the clutch release bearing shows signs of wear, replace it. Apply a moderate amount of lubricant to the input shaft splines. Check clutch disc centering.
Vehicles with automatic transmission DSG
If there is no needle bearing in the crankshaft, install it.
Vehicles with all-wheel drive
Install the corner drive bracket.
All
Screw gearbox to engine. Install starter. Insert the power unit into the body. Screw in bolts -arrows- for engine mounting by hand, but do not tighten. First screw in bolts -arrows- for gearbox support by hand until they are in contact with the bearing surface.
Note: Only after adjusting the power unit supports, tighten the bolts completely.
Remove engine bracket -T10359- from engine. Install drive shafts.
Vehicles with manual gearbox
Install the clutch slave cylinder. Install cables with cable supports.
Vehicles with automatic transmission DSG
Install on the gearbox and adjust the selector cable.
Vehicles with all-wheel drive
Connect cardan shaft to bevel gear.
All
Install exhaust pipe with catalytic converter. Install the air conditioner compressor. Install poly V-belt. Adjust the support assembly of the unit. Install the battery bracket. Electrical connectors and cabling. Install the air filter housing. Install the battery and carry out the work required after reconnecting the battery. Check oil level.
Attention! Excessive voltage creates a risk of damage to the control units. It is forbidden to use an ordinary device to start the engine!
Connect the coolant hoses with quick couplings to the heater heat exchanger. Fill up the coolant. Install the subframe. Install the front fenders. Install soundproof cover. Install the engine cover. Interrogate the event recorders of all units and erase the errors resulting from the removal and installation of the engine. After clearing the event recorder of the engine control unit, re-create readiness codes. Carry out a test drive. In conclusion, check the vehicle systems and, if necessary, eliminate the malfunctions that have arisen.
