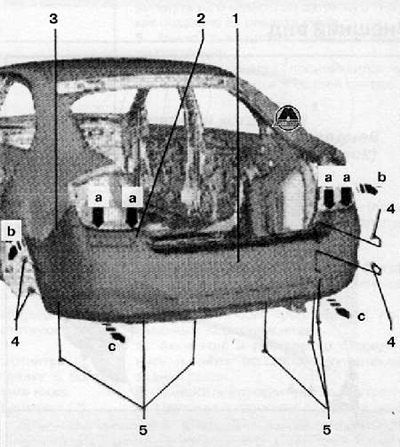
Removing
1. Remove the rear lights assembly (for details, see the relevant section in chapter Electrical equipment and electrical systems).
2. Unscrew the fastening screws (4) from the inside of the wheel arches on the right and left side, as shown in the figure below.
3. Unscrew the lower fixing screws (5), shown in the figure below.
4. Detach the rear bumper (1) from the clips on the side rails (3), arrow «b», as shown in the figure below.
Note. Removal and installation of the rear bumper is carried out with the help of a second mechanic.
5. Detach the clips (arrows a) on top rails (2), as shown in the figure below.
6. Disconnect the rear bumper assembly (1), moving it parallel to the longitudinal axis of the car (arrows with), as shown in the figure below.
7. Disconnect the wiring harness connectors on the inside of the rear bumper.

Installation
1. Connect the wiring harness connectors on the inside of the rear bumper.
2. Install the rear bumper with an assistant on the guides.
Note. When installing the rear bumper, make sure it moves parallel to the side rails on the right and left side of the vehicle.
3. Press the rear bumper against the central and side sections of the guides until the characteristic click of the latches.
4. Check and make sure that the gap around the perimeter of the rear bumper is uniform and minimal.
5. Install and tighten the screws securing the rear bumper to the required torque.
