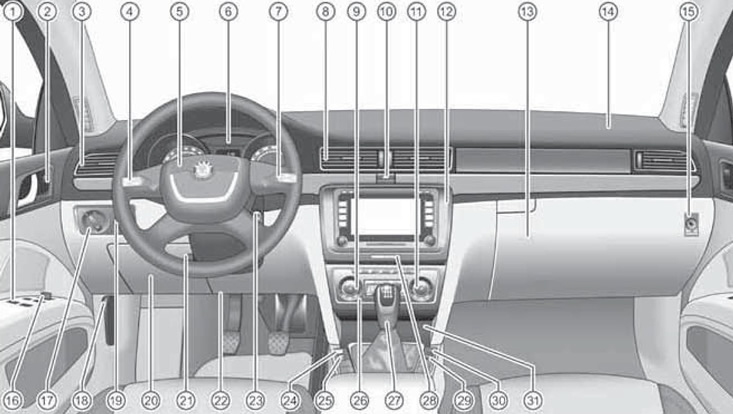
12.1 Location of controls
1 Power window control switches (see Section 5)
2 single lock key (see section 1)
3 Side air vents (see Section 14)
4 Left stalk
5 Steering wheel with horn switches, driver front airbag (see Section 10), audio/navigation/telephone control keys (see Section 15) and display control keys in the instrument cluster (see Section 13)
6 Instrument cluster (see Section 13)
7 Right steering column switch
8 Central air vents (see Section 14)
9 Driver's seat heating switch (see Section 9)
10 Alarm switch
11 Front passenger seat heating switch (see Section 9)
12 Audio/navigation unit (see Section 15)
13 Main storage box
14 Front passenger airbag (see Section 10)
15 Airbag switch 14 (see Section 10)
16 Switch for adjusting / heating / folding outside rear-view mirrors (see Section 9)
17 Switch for external lighting and instrument lighting
18 Hood release handle (see Section 3)
19 Headlight range and instrument illumination controls
20 Driver glove box
21 Steering column adjustment lever (see Section 9)
22 Driver's knee airbag (see Section 10)
23 Ignition switch
24 ASR switch (see Section 24)
25 Tire pressure control switch (see Section 19)
26 Climate control panel (see Section 14)
27 Transmission control lever (see Section 23)
28 C/L pillow condition 14 (see Section 8)
29 Park assist switch (see Section 17)
30 Parking assistance switch (see Section 17)
31 Niche for small items or ashtray
Left stalk switch (4 in illustration 12.1) created for:
- turning on/off direction indicators;
- switching between low and high beam headlights;
- high beam signaling;
- on/off parking lights;
- thermostat control (in the presence of, see Section 16).
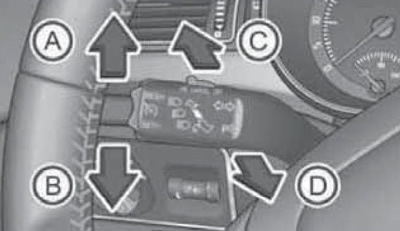
To turn on the left or right turn indicator with the ignition on, pull the left stalk lever down or up, respectively (B or A in illustration 12.2) through the point of resistance. At the same time, in the instrument cluster, the indicator for turning on the corresponding direction indicators lights up in a flashing mode. When the turn is completed, the switch lever automatically returns to the neutral position. To forcibly turn off the direction indicators, pull the lever to its original position manually.

12.2 Left stalk positions
Note: The rapid blinking of the indicator indicates a malfunction of the vehicle's direction indicators (not a trailer!), - check the bulbs.
When changing lanes, you can use the function of turning on the direction indicators 3 times. Pull the left upper stalk lever up or down without moving it past the point of resistance and release, the direction indicators will flash 3 times and the lever will return to the neutral position. If you do not release the lever, the direction indicators will continue to work.
Note: You can disable and enable this function at a Skoda workshop, or through the instrument cluster display menu (if this menu exists, see Section 13).
To turn on the high beam headlights with the low beam headlights on, pull the lever of the upper left stalk switch away from you (C in illustration 12.2). Turning on the high beam headlights is accompanied by the inclusion of the corresponding C / L blue color in the instrument cluster (see Section 13). To switch back to low beam mode, push it away from you again or pull the lever towards you to its original position.
To signal high beam headlights, pull the switch lever towards you (D in illustration 12.2). In this unlocked position, the high beam will turn on even when the ignition is off and will remain on until the switch is released. Turning on the high beam headlights is accompanied by the inclusion of the corresponding C / L blue color in the instrument cluster (see Section 13).
To turn on the parking lights (marker lights on one of the sides) turn off the ignition and move the lever up or down (A and B in illustration 12.2).
Note: If you turn off the ignition while the direction indicators are on, the parking lights will not turn on. You can turn on the parking lights on both sides - turn on the parking lights and lock the car.
