Note: Regardless of the maintenance schedule check intervals (see Section 3), do not allow liquids to leak under the vehicle - such leaks indicate a malfunction that should be repaired immediately.
Note: For a description of checking the battery electrolyte level, refer to Section 17.
1. Fluids are an integral part of lubrication, cooling, windshield washer systems, brake systems and others. Due to the gradual consumption and contamination of fluids during normal vehicle operation, they should be replaced periodically. Add only fluid that meets Specifications.
Note: Whenever checking the fluid level, the vehicle must be on a level, level surface.
Note: Engine oil consumption depends on driving style and vehicle operating conditions, but should not exceed 0.5 l per 1000 km of run. Higher oil consumption is a sign of worn seals and/or piston rings or engine shaft seals. New engines reach normal oil consumption only after approximately 5,000 km.
Visual control of leaks
2. With an oily engine and high oil consumption, check the following for leaks:
- laying of the pallet of a crankcase of the engine;
- engine oil drain plug seal;
- D/V seal for engine oil pressure;
- oil filter gasket;
- gasket between the block and the cylinder head;
- cylinder head cover gasket;
- oil filler cap seal;
- crankshaft and camshaft seals.
Since in the presence of a leak, the oil spreads over a large surface of the engine, it is difficult to localize it immediately. To detect leaks, proceed as follows:
3. Clean the engine by covering the alternator and fuse box with a plastic bag, spraying the engine with normal cold cleaner and washing it out with water after a short time.
4. Sprinkle mating surfaces and seals on the engine with lime or talc outside.
5. Check engine oil level and correct if necessary (see below).
6. In order to warm up the oil, make a test drive on the car - the viscosity of the heated oil will decrease, and it will come out faster at the leaks.
7. Finally, examine the engine by lighting it with a lamp. Locate leaks and fix them. If it was not possible to detect leaks using the described method, a special additive to motor oil can be used to determine its leaks in ultraviolet light (see instructions for use included with this supplement).
Checking and adjusting the level
8. Checking the level of impellent oil is done using a dipstick with a yellow handle (4 in the illustration Section 1), installed in the guide tube.
9. Measuring the level of impellent oil should be done on a cold engine, or at least 3 minutes after turning off a warm engine.
Note: If you start the measurement immediately after turning off the engine, the oil remaining in the upper part of the engine will not have time to drain, and the measurement results will be erroneous.
10. Remove the probe from the guide tube and dry the probe blade with a clean, lint-free cloth or paper towel. Insert the dipstick all the way back into the guide tube and remove it again.
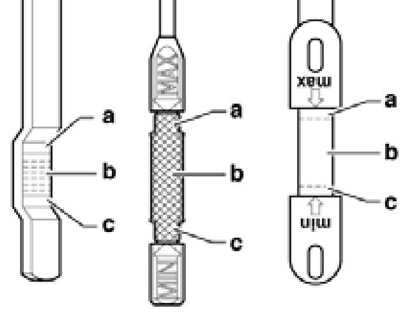
11. The height of the oil-wetted portion of the dipstick will correspond to the oil level in the engine. This level must be in the area (b on resist. illustrations) probe. If the level dropped to the area (With), add approximately 1 liter of motor oil in small portions to bring the level up to the (A), as described below. If the level is above the area (A) oil should be pumped out, because otherwise, engine seals and catalytic converter may be damaged.
12. To add oil, remove the oil filler cap, - with the oiler icon, (3 in the illustration Section 1). Add oil in small portions, no more than 0.5 liters. After topping up the oil, wait a few minutes for the level to stabilize, then recheck. Re-adjust if necessary. If dirt is found on the filler cap, wash it with gasoline. Finally, tighten the oil filler cap tightly.
13. Checking the oil level is an important preventive procedure that should be done as often as possible, and also before every long trip. In addition, attention should also be paid to the condition of the oil: a milky color or the presence of drops of water in the composition of the oil may indicate a violation of the tightness of the cylinder head gasket or a crack in the head or cylinder block, as a result of which coolant enters the oil. In this case, the engine should be repaired immediately. Each time you check the oil level, run your thumb and forefinger over the dipstick blade before wiping. If dirt particles or metal particles are found adhering to the dipstick, the oil and filter should be changed (see Section 6).

4.11 Engine oil dipstick areas
