Car wash
1. The general condition of the car body significantly affects its estimated value. Servicing the body is simple, but you need to do it regularly. Failure to follow these procedures, especially after minor damage, can quickly result in extensive body wear and costly repairs. It is also important to maintain hidden body parts in good condition, such as the underbody and inner surfaces of the wheel arches.
2. The main body maintenance procedure is washing with plenty of water (from a hose), allowing you to remove all adhering dirt and solid particles from the car. It is important to wash them off so that the gravel does not scratch the paint. The wheel arches and underbody also need to be washed - the dirt accumulated on them absorbs moisture from the environment, which increases the risk of corrosion. It is easiest to clean the bottom and arches in rainy weather, when the mud build-up is soaked and soft. Sometimes in rainy weather, the bottom clears itself, and this is a good time for inspection.
3. If the car is heavily soiled, especially the underside and engine compartment, some car owners use pressure steam cleaning. Although this method is fast and effective, especially for removing oily mud accumulations, which in some places can reach a considerable thickness, its use has some disadvantages. The steam pressure simply rips hardened dirt off the paint, causing the top coat to scratch and soon become dull. In addition, this pressure can cause moisture to penetrate door and glass seals and lock mechanisms (together with the solvent added to the cleaning steam) can enter crevices and components where it would not penetrate under normal conditions. When using such equipment to clean the engine compartment, water can get into the components of the fuel and electrical systems. In addition, the protective coating will be removed. which is applied to many small components during the manufacturing process; this can promote corrosion (especially on internal electrical connectors) and cause engine malfunctions or electrical short circuits. Also note that if the jet is directed directly at any of the oil seals, the sealing lips of the latter may allow water to enter the engine or transmission. Steam cleaning requires great care, so it is recommended to avoid it on a regular basis.
4. A much better solution to the problem is to wash the car with a hose. First you need to wash off as much loose dirt lying on top as possible, simply by directing a jet of water at it (even if after that the engine compartment will still seem dirty). If there is an oil leak or oil/grease buildup due to another cause, the build-up must be removed using one of the special solvents, such as «Holts Engine Cleaner» or «Holts Foambrite». applying it to the contaminated areas with a brush. After that, the dirt just needs to be washed off with a jet of water, and then the protective wax layer should be restored if it is damaged by a solvent (see below). 5 Normal washing of the car body is best done with cold or warm water using a special car shampoo such as «Holts Turtle Wax Zipwax» or «Turtle Extra Car Wash and Wax». Remove dead insects from stains with products such as «Holts Fly Squash Remover»; tar stains can be removed either with a special solvent «White Spirit», and then with soapy water to remove all traces of it, or with a compound «Holts Body + Plus Tar Remover». Follow that. so that water does not get into the air intakes of the hood, and after washing, make sure that the drain pipe of the heater air box is not clogged, i.e. all the water went through it.
6. After washing painted surfaces. dust them with chamois to add shine. Coating surfaces with a thin layer of wax polish will give additional protection against chemical air pollutants. If the paint has faded or oxidized, use a specialty cleaner/polish combination. to restore shine. This requires some effort, but such difficulties arise only if regular washing has been neglected. Coloring «metallic» requires careful handling - use a special non-abrasive cleaner so as not to damage it.
7. Chrome body parts should be handled in the same way as paint.
8. Windshields and windows should be washed periodically with a glass cleaner. Never use wax or chrome body polish on the glass.
Exterior body panels inspection
9. Once the vehicle has been washed and tar and other surface stains removed, carefully inspect all paintwork for chips and scratches; especially carefully check the vulnerable areas of the front (hood and spoiler), as well as the area around the wheel arches. Any paint damage must be repaired as soon as possible, according to the conditions under which the manufacturer issued anti-corrosion warranties for the vehicle (ask your Skoda dealer for details).
10. If a fresh chip or shallow scratch is found, in which rust has not yet formed, this place can be tinted with a special tinting pencil - they can be bought from Skoda dealers. More serious damage or rusted chips can be repaired as described in Chapter 4, but if the damage or corrosion is so severe that the panel needs to be replaced, seek the advice of a professional.
11. Be sure to make sure that the drain holes and tubes of the doors and the air box are absolutely clean so that rainwater can drain freely through them (see photo).
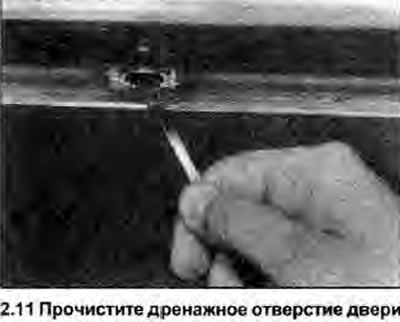
Checking the protective layer of the bottom
12. Wax underbody protection should be inspected once a year, preferably in late autumn. During the inspection, the bottom must be washed - thoroughly, but with the necessary precautions (see point 3 above regarding steam cleaning). After that, restore the protective layer, if it is damaged, using a special compound «Holts Undershield». If any of the body panels have been removed for repair or replaced at all, be sure to inject wax into their cavities, sill, etc. to maintain the level of body protection provided by the vehicle manufacturer (see next subchapter).
Car conservation
13. To improve the corrosion resistance of the car, the German company «Theroson» in cooperation with the manufacturer «Skoda» in Mlada Boleslav, has developed an optimal technological process for the preservation of the most corroded parts of the body - closed profiles and cavities. The principle of conservation. known by the name «ML method», consists in applying a film of a very stable preservative (Teroteks, Tektil, Resistin ML), which has elasticity, good adhesion, its important properties are viscosity and hairiness. The preservative agent is applied using a pneumatic gun with flexible extension nozzles, equipped at the end with a special spray gun.
14. Car «Skoda Favorit», compared to previous models «Skoda», differs in a different body structure, so the number and choice of conserved points are different. The figures below clearly show, without the need for additional explanation, where and how to apply a protective wax composition. Compound injection points (27 pcs.) also listed below.
15. Before starting the actual application, it is necessary to thoroughly wash and degrease the bottom (if not done yet, see above). The body must be dry and full of cavities, so the machine must be placed for at least 12 hours in a heated and ventilated room with a temperature of at least 25°C. If some part of the body is already corroded, this place must be thoroughly mechanically cleaned.
16. Carry out the following dismantling work:
- a) Remove the bottom panel of a forward rack.
- b) Remove the front winders along with the seat belts.
- c) Remove the spring-loaded tailgate contact.
- d) Open the hood and remove the battery.
- e) Remove the front wheel arches.
- f) Drill 2 holes with a diameter of 10 mm on the inserts of the rear wheel arches, having previously marked their centers. Remove burrs.
- g) Jack up the car and drill 4 holes with a diameter of 10 mm on the underside of both outer sills.
- h) Remove the plugs from the holes of the left and right inner sills (4 things.)
- i) Before spraying protective composition, it is recommended to cover the front and rear seats. When spraying compound into the tailgate, cover the door opening with a tarpaulin.
- j) Drilled holes after applying the protective composition must be plugged with rubber plugs with a diameter of 10 mm.
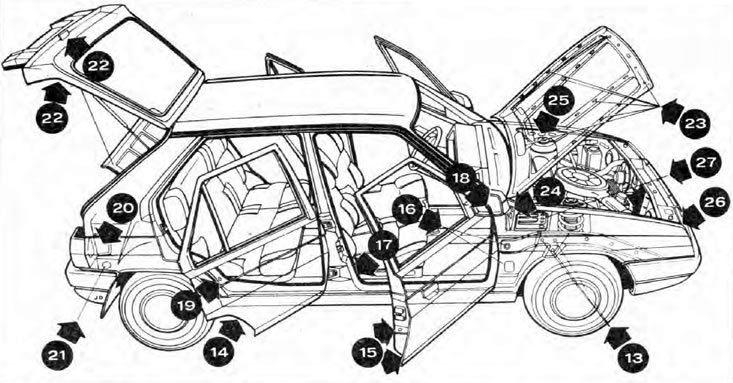
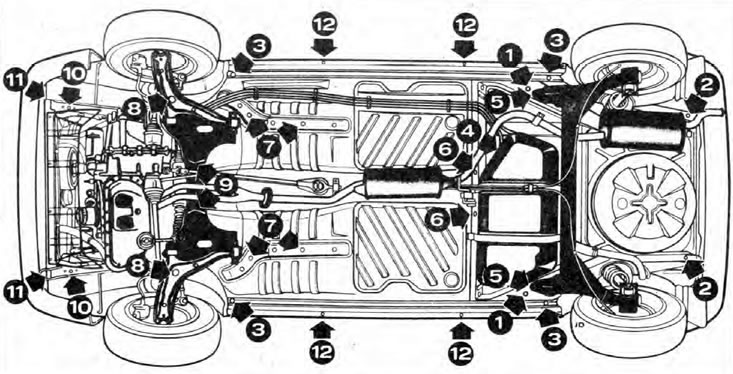
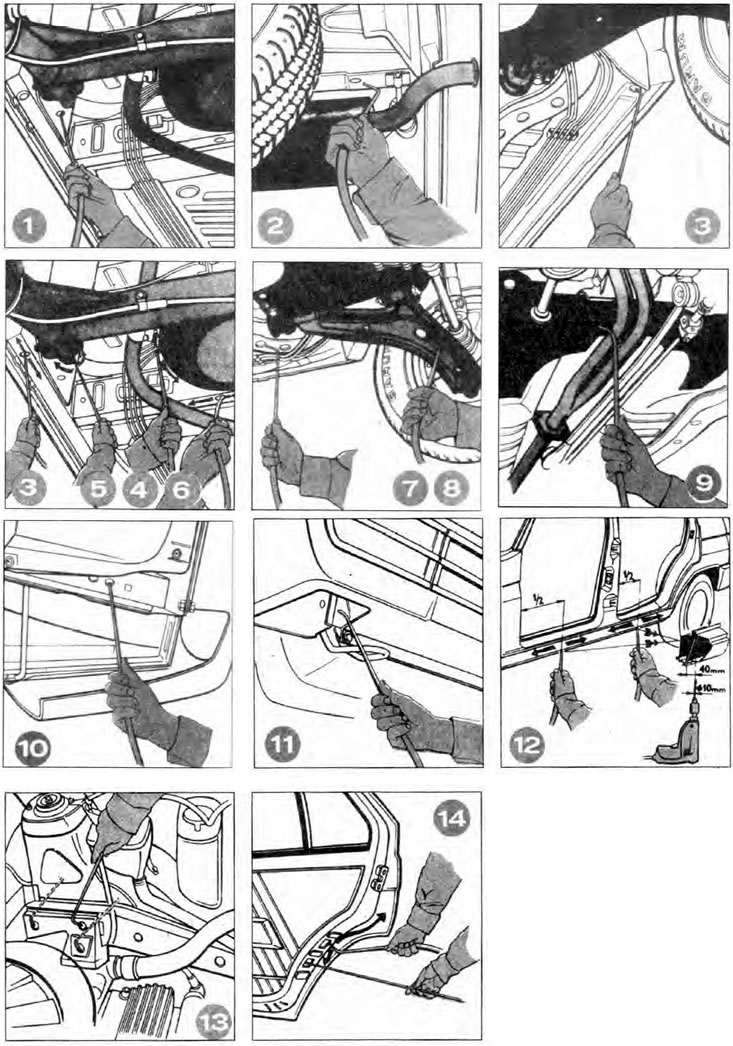
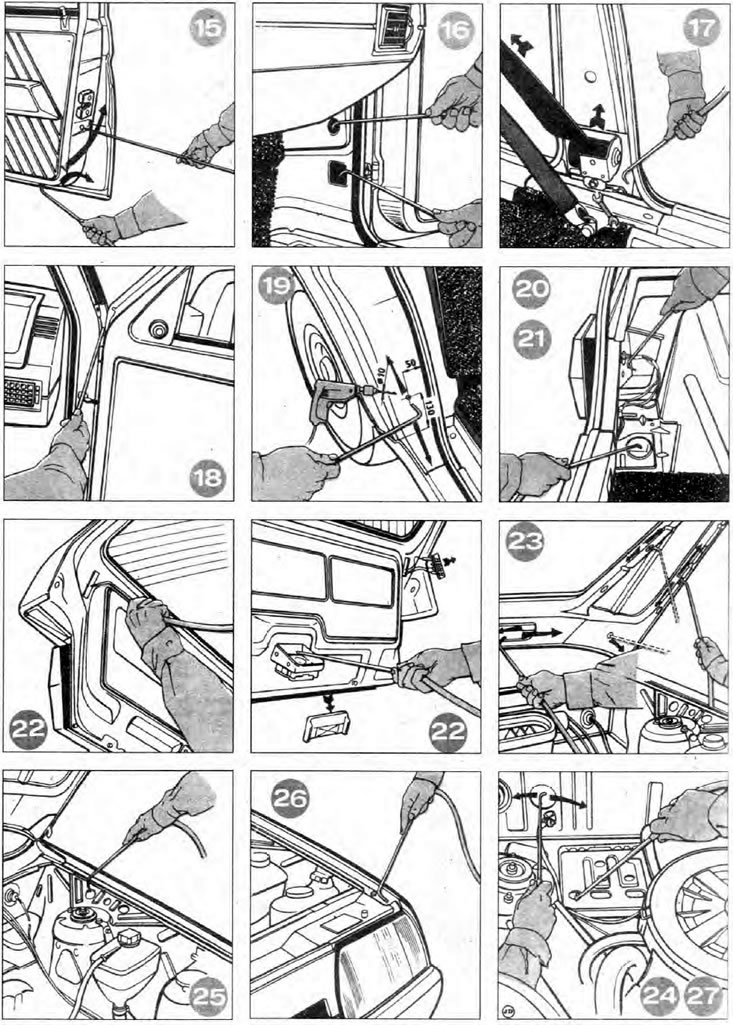
1. Front cavity of the rear spar; 2. The rear cavity of the rear spar; 3. The inner cavity of the door sill; 4. Section of the rear floor above the tank; 5. Mounting the rear axle; 6. The cavity of the transverse beam in front of the tank; 7. Cavities of the stiffening beam of the middle floor; 8. The cavity of the lower arm of the front suspension; 9. Cavities of the sub-frame; 10. Front cavity of the front spar; 11. Connections of the front spar and cross beam; 12. The outer cavity of the door threshold; 13. The cavities of the front spar amplifier; 14. Tailgate cavity; 15. The cavity of the front door; 16. The cavity of the middle pillar and the rear cavity of the front spar; 17. B-pillar; 18. The space between the wing and the front pillar; 19. The cavities of the rear wheel arches; 20. Cavities behind the rear wheel arches; 21. The space of the stiffener behind the rear wheel arches; 22. The cavity between the surface and inner sheets of the tailgate; 23. The space between the top sheet of the hood and the stiffener; 24. Cavities of the partition of the engine compartment; 25. The cavity of the upper mounting of the shock absorber; 26. The space between the wing and the headlight housing; 27. The cavity of the battery shelf.
