Note: Please refer to the precautions in Chapter 1.
General information
1. The fuel priming pump and the fuel gauge sensor are combined into one unit, which is installed on top of the fuel tank. They are accessed through a hatch in the trunk floor.
Removing
2. Depressurize the fuel system (Chapter 9).
3. Park the vehicle on a level surface, then disconnect the negative battery cable.
4. Return the rear seat forward, remove the trim from the trunk floor.
5. Loosen and remove the inspection hatch fixing screws, lift the hatch off the floor.
6. Disconnect the wiring harness connector from the pump/sensor assembly.
7. Wrap a cloth around the fuel supply and return hoses to absorb spilled fuel, then loosen the clamps and disconnect the hoses from the fittings on the gauge.
8. Unscrew the plastic fixing ring, remove it.
9. Turn the pump/sensor to the left, raise the block in the tank above the fuel level and hold until the fuel drains from it.
10. Remove the pump/sensor assembly from the vehicle, lay it on a piece of cardboard or cloth. Inspect the float at the end of the sensor, if it has fuel or dents, replace the block.
11. The fuel suction tube is spring-loaded to ensure a constant immersion in the fuel at the very bottom of the tank. Check that the receiving tube moves freely under spring tension relative to the sensor housing.
12. Inspect the rubber seal, replace it if necessary.
13. Inspect the sensor slider and conductor; rinse them of dirt that may be in between the turns.
Installation
14. Install the sensor in the reverse order of removal, paying attention to the following:
- A) Do not bend the float arm when installing the block.
- b) Lubricate the rubber seal with clean fuel before installing it in the working position.
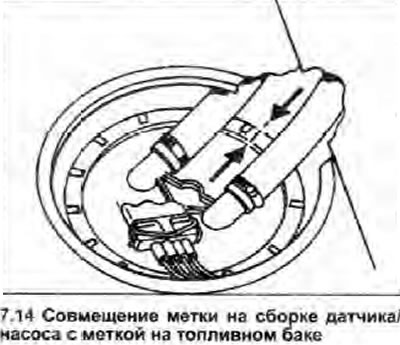
- With) The marks on the sensor body and on the fuel tank must be aligned (see illustration).
- J) Reconnect the fuel hoses - respect the direction of flow (indicated by arrows).

